Lqd's Journal

Icon

It's actually pronounced liquid!

TwitterFormat proposal: tEdit

I’m a Twitter fan, and I love thinking about ways to improve the experience we have using it, as I’ve shown previously here for a mockup on how to display short links — which to my surprise is how Twitter now shows them in #newtwitter — or on Flickr for a mockup on helping write microsyntaxes and TwitterFormats.

Even though Twitter is adding new features in regards to tweet management, most of the existing metadata mechanism and commands described by microsyntaxes and TwitterFormats are still very much valid. For instance, Twitter’s User and Site Streams provide deletion events rendering tDelete obsolete (obsolete for clients using the Streams, which the majority of clients are not yet supporting).

Another feature, Annotations — announced by Twitter around April 2010 or so, will allow adding metadata when a tweet is created. This is expected to obsolete some other of those microdata approaches, even though adding metadata after the fact would be impossible. Still, Annotations have been seemingly put on the backburner, with more pressing projects requiring Twitter’s resources and attention.

Even in a future world where we have Annotations, some TwitterFormats are still valid, usable and valuable, and this is a tweak of two of them.

This is a proposal for a “new” TwitterFormat (TF from now on) for editing a tweet, more precislely combining the existing tStrike and tInsert to make them easier to use manually and to adopt a common idiom for editing or replacing content (albeit surely only known by advanced users).

Syntax

/edit “incorrect phrase or word” “correct phrase or word”

As an alternative up for debate
/s “incorrect phrase or word” “correct phrase or word” or
/s/incorrect phrase or word/correct phrase or word/

One could also add the same options specifiying the tweet you’re correcting
/edit “incorrect phrase or word” “correct phrase or word” from -2 for the second-to-last tweet
/edit “incorrect phrase or word” “correct phrase or word” from 123456789 for a specific tweet ID

Summary

tStrike allows you to remove words or characters from previous tweets, and tInsert allows you to insert words or characters into previous tweets. I was looking for something that did both at the same time, as to me correcting typos is most of the time removing the wrong word or characters and inserting the correct one in its place. I thought tReplace would be what I was looking for but it actually replaces the whole tweet, and not just a part of it.

You can certainly combine tStrike and tInsert in a single tweet, but I find it to be cumbersome for manual use. The resulting tweet would also be bigger, leaving less characters for the actual typo fixing — even though it’s rather less probable for one to replace most of a single tweet compared to one or two words. TF–aware clients are — at the beginning — most likely to implement handling input only rather than output, leaving the user to create the appropriate tweet. In this case — in my mind a very probable case — I’d want to make it easier to create the typo-correcting tweet.

For instance, to replace part of a tweet using those two formats, you’d have to tweet /strike “some phrase” from last /insert “this phrase” after “that other phrase” in last. Pretty bulky. You could argue both “from last”s could be removed from tStrike and tInsert to make them more concise, modifying the last tweet becoming implicit if no tweet target is specified.

So, I’d want a simpler and shorter syntax for the specific use case of replacing content, not supporting every tInsert use case (even though inserting before or after is still a more specific case of replacement using more search tokens for the content you want to replace)

Some advanced users (and quite a lot if I had to take a guess – most likely developers) are already used to regex/sed/awk/etc matching and replacing, to the extent that Skype chat also implements it using that syntax. So I’d propose having that syntax as an alternate, or an alias of the main syntax. I propose /edit “old” “new” to be the main syntax, with potential alternate /s “old” “new” or /s/old/new (which is close to the regular developer syntax — however I wouldn’t recommend offering options after a final ‘/’ like case insensitive or multiple matching).

Raison d’être

The reasons why a user would use tEdit are exactly the same as tStrike and tInsert, modifying a tweet after the fact, and notifying your followers in realtime. Their clients can show the modification events exactly as described in those original TFs.

License

This TwitterFormat Proposal is released under a Creative Commons Attribution License.

I’d love to hear your thoughts on the syntax, use case, and so on. You can find me at twitter.com/lqd.

The Swing + jQuery experiment

A great man once said: “I love it when a plan comes together”.

It’s time to explain the final pieces in this little pet project of mine, and release the whole as a (already rather usable) preview.

Swing has many advantages, let’s agree on that, but on the other hand it has many, so many, things that just make me want to jump out my 1st floor window when I use it. None of those are deal-breakers per se, but it does feel a lot like ‘death by a thousand paper cuts’. This is my attempt at correcting those pain points, and making using Swing a bit easier.

The problems I’m trying to solve

Without a doubt, the biggest pain point in using Swing is its API. First of all, components have a huge number of methods, it’s really frightening. A lot of them are useless AWT methods. To me, the most important qualities of a good API are related to the user experience: conciseness, and discoverability.

As a user, I want to write short amounts of code, and I don’t want to need to remember a lot about how the API is used, or read a ton of docs to do simple things. Swing fails on both of these points.

I could go on. The whole event system requires a lot of classes and methods. There’s no way to group components in a logical group, only in a physical group. So if you want to say hide 5 components, your choices are 5 setVisible() method calls, or group the components in a panel, and hide that one instead. The latter offers a nicer way to hide the components in one call, but comes with performance and layout problems related to adding another component in your UI.

And so on.

jQuery’s mantra is ‘Write Less, Do more‘, and that’s a motto I can get behind, no matter the programming language. How does jQuery achieve clean and concise code, and how would the concepts it’s built on look in Java, and Swing ?

The answer to that has multiple parts, and by now you’ve seen most of them. A query engine (hQuery + Shizzle) will help you select one or more components in your UI – which allows you, if you want, to not have to create a member variable for each of your components. You’ll then interact with the results of your query using a composite – reducing boilerplate code – or your member variable components as usual, using Swing wrappers/builders (HTk) implementing a hopefully easier API. Let’s start from the top of the stack and build our way down.

HTk

There’s multiple ways to make the Swing API easier to use. I could modify the Swing classes directly, but that would require too much work. I could make new Swing components performing the functions of existing ones, but that would force me to extend JComponent at the very least, and having a lot of methods I don’t want in my API. The last of the most obvious methods is I could have builder or wrapper classes that create or configure an existing JComponent instance, and only interact with the builder.

The latter allows you to start with a clean slate, and offers the best work/reward ratio.

HTk is a small set of builders for the most common components and methods I use (the version I’ll release today only targets the most basic components, but the version I use contains builder for more advanced components like tables and list. I want to wait to have more experience using and improving them before releasing those). I already talked a very tiny bit about them last time when we talked about Shizzle, and today I’ll describe them in more detail.

For “each” of the JComponent classes, there would be a HComponent class that would provide the builder for the associated JComponent. HButton builds a JButton, HLabel builds a JLabel, and so on. The code still looks like you’re using Swing components, but the HComponents are never added to the UI – In turn, it also creates a problem, since you don’t have any HComponent in your panels, when you want to query them (say, disable all the buttons that apply to a table row when there’s no row selected in the table, this should be one line of code, and now it can be), so each HComponent adds style classes so you can still query them, as we’ll describe more in the next section.

So when you create an HComponent, it’ll create a delegate JComponent to configure, or you can pass it an existing JComponent instance – since you might want to interact with the components using the same API regardless of whether you’ve already added them to your UI or not. This delegate JComponent can be accessed with the asComponent() method. This is useful to know because as I’ve said the point is to reduce the number of methods in components to most useful ones, and you need to be able to access the underlying JComponent to call the less common ones. HTk is not a new toolkit whose goal is to replace Swing, the goal is to help you for the most common cases you’ll encounter (right now it’s of course biased towards the most common cases me and the friends at my company encounter – in our own projects and the client projects we use it in; but releasing it will hopefully start a discussion on what your needs are, dear reader).

The other methods are either just getters/setters and methods from the underlying wrapped JComponent class, or new methods to simplify the existing API (eg, events) or new features such (eg, style classes).

For conciseness, the HComponents support method chaining and I wanted to talk a bit about that. Since setters usually return void, and chaining setters actually looks weird – see component.setX (2).setY (0) – I started having with* methods too, a fairly traditional way of having a setter returning this. However, that made having 3 methods for each property instead of just 2, which went directly against the design principle of limiting the number of methods. So I decided not to use the JavaBeans notation and I used the name of the property for the getter and the chainable setter, mimicking named arguments in a sense – component.x (2).y (0). As I don’t need to use reflection on those components, it has not created any problems yet. Nothing is set in stone, we can talk about it, maybe you have a better solution.

Since the goal was just to wrap Swing objects, just to have a smaller API, from blank or existing instances, I chose to have stateless components, and then little by little we thought we could add some features that required state (say a suffix in a JLabel), and then also wanted to create custom components. I don’t have the complete answer on this yet, things can be improved greatly to make it easier to add features and create custom components. Until now, the focus has mostly been put on using existing Swing APIs, rather than creating new components, so it’s understandable – How this is done right now, is the component’s state, when it needs one, is stored using client properties in the delegate JComponent. It’s a little bit tedious (for people who write HComponents, so you’re safe here) and we’ll talk about this later in the ‘What can be improved’ section.

The more common new methods in HComponent are used for queries. Naming a component with as (“aName”), and handling its style classes (addStyle and removeStyle, hasStyle, toggleStyle, etc). Then there’s also a number (actually too big a number) of methods dealing with the component’s border some dealing with sizes, bounds and location, property change listeners, etc.

Since I just mentioned property change listeners, I’d like to take a moment to describe what the plan is for events. Still a work-in-progress, but I added some example code in this preview, and I think we can do the same thing other toolkits have done, and just use one method call to add a listener, and one to remove it, whether it’s a regular Swing event or a new one (for when custom component creation is more fully fleshed out). You have a generic EventSource interface that binds the event type to its listener type (say ActionListener to ActionEvent), which would be used when registering listeners. HComponents have a connect() method, which takes an EventSource and an event listener. You’d then have an EventSource object for Swing events (in the preview code you can see ActionEvents, MouseEvents, MouseMotionEvents, MouseWheelEvents) and another class for custom event sources (based on composites of course, which would then use another generic listener interface EventListener). For Swing listeners, it’d look like this: component.connect (Events.mouse, aRegularAWTMouseListener) or component.connect (MouseEvents.click, aRegularAWTMouseListener). I guess you could also have component.click.connect (listener) if you wanted to. The HComponent will then call the appropriate addListenerType method.

Enough about components – and specifics can be seen in the code – and let’s turn to the container, the HPanel class.

At its core it’s very basic, providing standard methods to add and remove JComponents or HComponents, or setting the layout manager, etc. But there’s really two things of interest here. The first is the logical grouping. I’ve mentioned style classes before, and they’re part of the answer to the lack of logical groups (querying for components matching a set of rules in general, and most of the time having a specific style class, allows for an easy way to get a group of components regardless of where they are in the component tree). The HPanel offers a way to automatically add a style class to a whole bunch of components without adding the style class to each of them manually, it’s a little helper that can be useful. The group method returns a StyleGroup object which’ll just have add() methods. By calling them you’ll add your component to the panel as usual, and also at the same time the group’s style class will be added to the component’s existing style classes. Like so panel.group (“myStyle”).add (component1).add (component2). I decided not to use varargs because you can add both JComponents and HComponents to an HPanel and thus to a StyleGroup, and so you couldn’t have one method that’d take a variable set of JComponents and HComponents.

The second thing of interest is the most novel one, it’s the link with the next layer, the query engine. So there’s methods taking a String selector query and returning the handle to the result, an HQuery instance.

hQuery

Now that HTk provides a smaller API over Swing, we can follow jQuery’s path and provide an object that would help with conciseness over multiple similar method calls, or as a way to remove the need for having a member variable for every component in your screen/page (as the default Netbeans/Matisse settings generate).

A long time ago we saw that composites allow for concise code, we still need a way to fill the composite with values, to loop over and do its proxy job. Last time we saw Shizzle, a query engine that worked on Java and Swing objects using the CSS selector syntax, this will give us our components. This is where hQuery comes into play, as the glue code between a query and the results’ composite.

Again, hQuery is ridiculously small, you only need to know about 1 class (actually 1 interface; there’s also two implementations, both of which you’ll never need unless you want to extend the library. As I said very small).

When you call the query method on a panel, it’ll return an instance of the HQuery interface so you can interact with the results. Its implementation uses Shizzle, to query the panel component tree, and fills a composite with the results, really simple. I like to create a HQuery $ (String selector) { return query (selector);} method on my page/screen class (extending HPanel) so I can also have a short way of calling it.

So now $ (“aQuery”) returns an HQuery instance, but what can be done with it ? Mostly three things, the fist one being calling some methods defined at the HComponent level. For instance, returning to our early example, if I have a table and a set of buttons launching different actions, some of which only apply to the selected row (for those I would have just used a StyleGroup or individual addStyle calls on those specific buttons). In my selection changed listener, all I’d need to do is call $ (“.buttonsNeedingSelection”).enabled (false) if the selection was empty and all those buttons would be disabled.
Similarly, you can control the visibility of the results, manage the style classes, add the components to another panel, or detach them from their current parent container, or connect/disconnect an event listener, etc.

The second things an HQuery instance offers is to do some other query, using the results as a starting point. For instance you could use find() and search for some of the results’ descendants, or use the parents() methods, this time to query the component tree upwards.

And lastly, but the most useful in practice is getting some kind of handle on the results (a composite most of the time). Actually all the first set of methods, including the $ (“.style”).enabled (false) example we saw, create a composite on which they call a HComponent method, enabled() in this case.

As there’s different ways to use the results, there is going to be different methods depending on whether you want to loop over the results yourself or use a composite. In the first case you could use contents() to get the List of JComponents, but there’s another way. asJComponent() (if you have only one result) and asJComponents() (if you have 1 or more results) both take a class that extends JComponent, so you could do for (JButton b : $ (“JButton”).asJComponents (JButton.class)) {}. The same method exists for HComponents too, and since we’re querying inside a live UI containing only JComponents, every JComponent will be wrapped by an instance of the HComponent class you specifiy.

So these methods give you a List, but this is not the way I prefer to use hQuery. I usually want a composite of the results, and these are the last of the important methods this object provides. The asComposite() method takes a Class extending HComponent, and obviously returns a composite of the results accessible with a proxy of the class you specified (the parameter-less asComposite() method returns an HComponent composite, which is the most basic one, the ones used by the HComponent methods at the HQuery level). And there’s also 2 similar methods for composites on JComponents.

Most of the time I use the as() method, which just calls asComposite(). I’ll show you an example just after I describe one last trick. Since I’m using quite a similar API, I decided to apply Fabrizio Giudici’s cute class literal trick and I added in each of the HComponent classes two public Class variables for the component itself and the JComponent class it wraps. With a simple static import, you could select the text of one or more JTextFields with such a line $(“.HTextField”).as (HTextField).selectAll(); (Tip: If you’re using Eclipse, static imports can be added on demand, type $(“.HTextField”).as (HTextField.HTextField), select the HTextField variable, and then ‘add import‘).

Quite readable, short and clean, IMO. And since the query goes straight to Shizzle, of course all of its syntax is supported, which is pretty powerful.

The last method is a work-in-progress, and you can’t really use it just yet. Like jQuery, hQuery is really small, but the point is to have a tiny core that can be extended with plugins. The with() method takes a class extending the last of the 2 classes contained in hQuery (the DelegatedHQuery class), there’s some useless examples in the code, we’ll see what happens when we cross that bridge but the first plugins that came to mind were related to JXLayer, effects, animations and transitions, form validations, etc.

Shizzle and Composites

Since hQuery binds Shizzle and Composites together, under a nice simple interface, I’ve updated both versions. While Shizzle saw some little modifications, a couple more tests, and so on, the composites have changed quite a bit (even if I surely intend on recoding them from scratch once again, so they’re better tested, right now, it’s pretty well, organic).

The composites I’ve already described allow you to have any number of objects behave like one object (within certain technical restrictions). The version I released was based on the JDK’s dynamic proxy. The biggest advantage to this is you don’t need another library to use them. The big problem is it only works with interfaces. Since then I’ve switched to cglib to create composites of classes (this is where the technical restrictions come into play, as final classes and methods can’t be easily used in a proxy). It also comes with the perk that the proxies are faster than the vanilla JDK ones. The downsides are, there’s another dependency, and since we’re generating proxy classes, the PermGen could become polluted (even if in practice this has never happened to me, I have not looked at it that closely since today’s project only creates a low number of proxy classes. If that problem ever surfaces, Google’s Guice already contains solutions which can be looked at, and Guice also uses cglib, so it’d be fairly easy to integrate).

Composites are at the lowest level, you don’t create them or need to think about them, except in those specific cases where they technically can’t work: creating a proxy on final classes, calling final methods on a proxy, trying to use getters returning classes that can’t be put into another composite.

Another modification since last time is of special interest in the HTk method chaining. If you’re calling a method that returns something, a composite of the results of those method calls will be created (with the regular composite limitations) so you can call another method if you want to. (You can also extract the individual values if you want, look at the code)

What can be improved

Even if this preview is quite usable, and we do use it, there’s still some rough parts that can be improved. As I mentioned before, there’s little support right now to create custom components based on the HTk APIs. It should be much easier. Maybe instead of using client properties for each of the custom components properties, the full HComponent wrapper could be stored inside a client property. Maybe other self referring generics tricks could be used to help in creating classes extending from existing HComponents, like HPanel. Right now, you’d need to override a lot of methods just to return your own type to allow transparent method chaining mixing all the classes.

The different borders methods in HComponent are a little too numerous, I’d like to reduce them to one or two, and move the rest to an inner builder object – maybe component.border().top (5).bottom (2) – or an outer builder – component.border (Borders.empty().top(5).bottom(2)). You guys probably have better ideas.

What needs to be done or would be nice to have

The whole event mechanism is only at its beginnings. All the Swing event classes need EventSources. A consistent good way to use and create custom events should be decided.

Another nice one related to eventing could be live events. Something like $ (“JButton”).live (MouseEvents.click, listener). Basically, you insert your event listener as an AWTEventListener directly to EDT, and this listener would use Shizzle to see if the source matches the query you specified. So whether the UI component tree changed, if new JButtons were added or removed from the UI, you wouldn’t need to add another click listener. It seems cute and nice, but I’m not really sure it’d be as useful as in the HTML DOM (where events bubble and come back down already, which is not the case in Swing when there’s no registered listener for a specific event type)

And of course last but not least, the plugin system would also be interesting to have.

Move to github ?

Downloads

As always, the license in this preview is BSD.

Here’s the zipped Eclipse projects, containing both the source and the binary jars.

Conclusion

I hope this preview can start an discussion, be it about Swing pain points we could solve or even maybe JavaFX 2 (as it seems from the little slides I’ve seen they intend to keep the JavaBeans get/set rule; the only thing that seem different was about properties and events, where it seemed they would use a very low number of methods; I hope the awesome Alex Ruiz is being listened to up there, because he’s the man when it comes to small, powerful, concise and expressive APIs, just look at FEST and dare say I’m wrong).

I hope you’ll find this useful. To me, the combination of small and discoverable set of common methods HTK offers, coupled with composites and CSS selectors make a powerful set of tools.

I’d love to get feedback on this, you can find me at twitter.com/lqd.

Shizzle, a CSS selector engine for Java and Swing

*tap tap tap* Is this thing on ?

Der Plan – Part one

I’d like to present another piece of the big UI puzzle I’m slowly putting together. Shizzle is a query engine for Java and Swing that supports the CSS selector syntax.

It started one or two years ago as a straight port of Sizzle (jQuery and other libs’ selector engine) to Java. More for fun than, say, because it’s a clever idea: it just isn’t.
For fun, at some point I also started adding more selectors to Ben Galbraith and Dion Almaer’s Clarity. In the end, when this became something I wanted to complete, I restarted from scratch, TDD style.

Why ?

Querying allows you to remove member variables for inner components you rarely use. Just look at a Matisse-generated panel to see what I’m talking about.
Shizzle shines used with composites (which I’ve already talked about), and APIs tailored for chaining. Allowing you to have really concise, simple and expressive code, obviously very similar to what you do in jQuery. You’ll see some of this in the download, because I used it in the tests, but the main part has been removed so we have something to talk about next time!

How to use it

We have a lot to talk about, most of CSS selectors are supported. The ones that aren’t follow the same rationale as Sizzle, they’re just not useful. However, I sometimes went overboard and implemented some features and selectors that people will probably never use.

You use it like this. Create a Query like this new Query (“my awesome query”), and call the matches() method with the containers you want to look into. That’s it.

I’ll quickly describe what Shizzle supports, if you want more comprehensive (and normative) explanations, the official W3C spec can be found at http://www.w3.org/TR/css3-selectors.

Supported features

0 – Universal selector

*” matches everything!

1 – Type selectors

A query “Type” will match every Java object of the Type class. Note that it works on classes’ short names (ie, no package) and that it does not take inheritance into account. It just checks if an object’s class has the same name, so “JComponent” won’t match JPanels and so on. Common examples include “JPanel” “JButton” “JLabel” and so on.

2 – Id selectors

JComponents can have a name, and this selector targets it. “#name” will match every component that has been named “name”. Since there can be more than one component with the same name, this query can return more than one result (which is not the case with HTML). In practice, it doesn’t change anything.

3 – Style classes

HTML has the concept of classes, a multivalued (usually space-separated) property that labels an element with a string, which you then style using CSS. Here this concept uses a client property (“HTk.style”) to store the class values (which I’ve dubbed style classes, because just talking about classes would be confusing). The query “.style” will match every component that has our client property where one of the style classes is “style”. As you’ll see in the code, HTk helps in adding, removing, and getting the value of this style property. You won’t have to manage it manually, don’t worry.

4 – Attribute selectors

These selectors involve properties (getters only) and their value for matching purposes. This one is rather complex as you can check whether a property exists or not, check its value or compare it, and so on.

The query “[property]” will match every object that has a readable property named “property” (ie a “getProperty” method). I’m guessing you won’t be using it that much.

Values can be checked too, like this “[name=id]“. Which show how we could describe the id selectors we talked about earlier, as attribute selectors checking the value of the “name” property, using the “getName” method on each component. The “=” is the first of many operators, checking of course the property has exactly the specified value.

There are some microsyntaxes and types are “automatically” converted, for that purpose I’ve built a class for conversion. I’ve followed Tim Boudreau’s pragmatic rules about it (Dozer or Morph being way too complicated for what I needed here). You can compare floats to double and Strings to ints, and so on. Strings can be defined with single or double quotes, or, as just demonstrated, without quotes at all. You’ll see this in more (excruciating) detail in the unit tests.

[Aside: I’ve also included one example converter for Dates (eg “2009.12.01 12:45:12“) , and a more realistic one converting colors (accepting diverse formats such as the hex style “#FF0000” “#FF0000FF” “0xFF0000” “0xFF0000FF” “#F00“, constants in the Color class such as “red” or “RED” or “Color.red“, and finally the ones we often see in CSS like “rgb(255,0,0)“, “rgba (255, 0, 0, 255)“, “Color.rgb (255, 0, 0)” or “Color.rgba (255, 0, 0, 255)” variations).
I’m releasing this conversion “framework” (such a big word for one class) under the WTFPL, the Do Whatever The Fuck You Want Public License, in hopes we’ll stop having so many of them]

Common examples would be “[visible= false]” (notice the boolean conversion) or “[background=blue]” (using the Color conversion we just talked about)

The next operators involve checking the value of a String property. “^=” checks whether the String property starts with the specified value, “$=” whether the property ends with the value, “*=” whether the property contains the value, “~=” whether the property has one word being the value, “|=” is used with hyphen-separated values.

Now we’ll leave the regular CSS world, and go into the ease of use world. There’s no “different” or “greater than” operator, to negate tests, they use a special pseudoclass, which we’ll see later. I’ve decided to add “!=” “>” “<” “>=” “<=“, and these special Java ones “==” and “!==” (the “=” ending up using equals, where “==” is the “same as” operator and uses the regular == in Java. It happens this is not that useful by the way, it’s one of those times where I’ve already said I went overboard). The comparison operators use the Comparable interface, so you’ll be able to make queries with comparisons for any class that implements it.

Common examples are checking the bounds or location of a component “[x<=10.5]” and the likes.

While I was at it, I decided to throw in support for client properties here. So while we’ve been talking about attribute selectors for properties, know that the same applies to client properties. “[foo=bar]” will match any component that has a “foo” client property with a “bar” value.

5 – Pseudo classes

Pseudoclasses are usually used to check some specific state. While there are some predefined states in HTML/CSS such as “:checked” “:enabled“, there aren’t any Swing specific yet. What I did is add support for boolean properties as pseudoclasses. “:visible” is equivalent to “[visible=true]” and thus, will match any component whose isVisible() method returns true.

There’s also other selectors using the pseudoclasses syntax, but they have their own semantics, so they really are apart.

6 – Multiple selectors

Now that we’ve seen the most common selectors it’s time to talk about the fact that they can be combined. “JPanel#details” combining a type selector for JPanels and an id selector for the “details” name. Depending on the selector you could have some of the same type. Other examples could be “JPanel#link[visible=false]“, “[x=10][y=20][width=30][height=40]“, “[name=id][opaque=false]“, “.style.style2” and so on.

7 – Position selectors

Position selectors involve checking the index of the component, and allows you, when combined with other selectors, to ask for the first element (“:first“), like the first JPanel of the UI (“JPanel:first“), or the last one (“:last“), or the 5th one (“:eq(5)” or “:nth(5)“) or every other one (“:even” and “:odd“), or why not the ones after the 4th element (“:gt(4)“) or before it (“:lt(4)“), or all the ones between two values (“:range(2, 5)“). Those are coming from jQuery, they don’t exist in CSS.

8 – Structural pseudo classes

Similar to position selectors, structural pseudo classes are a little richer, as they apply to elements in regards to their parents, the number of other children they have, etc.

:first-child” and “:last-child” will only match components that are the first and last child of their parents.
:only-child” matches only elements that don’t have any siblings.
:nth-child()” is used for matching the index, like these simple selectors “:nth-child(1)” or “:nth-child(odd)” or “:nth-child(even)“. It’s also possible to use a 2n+a formula: “:nth-child(2n)” are all the children with an even index, “:nth-child(2n+1)” match the odd ones, “:nth-child(-n+2)” matches the first 2 children, “:nth-child(3n)” matches every 3rd child. Look at the tests to see some more concrete examples.

9 – Special pseudoclasses

There are two other pseudoclasses, namely “:has” and “:not“.

:has()” helps you match components having children matching a specific rule, for example “:has(JPanel)” matches any component that has a child that matches the “JPanel” rule, any container having at least a JPanel child will match this rule.

The “:not()” reverses results of a specific rule, for example “:not(JPanel)” will match any component that is not a JPanel. In CSS it’s interesting to ahve because there’s only affirmative checking on attributes for instance. There’s some specifics in CSS, you can’t have a complex selector inside, like another :not. I decided not to bother with these, so you can go wild and nest 15 :not if you want.

10 – Combinators

While you can combine selectors just by adding them together, you can also combine groups of selectors.

The simplest combinator is a space character ” “. It’s the descendant combinator, so you can have components matching a rule, who also have descendants (or parents, depending on how you look at it) matching another rule. “#parent #match” will match any component named “match” that has an ascendant named “parent”.

The child combinator “>” is used for immediate parents and children (whereas descendants and ascendants go anywhere in the component tree). “JPanel > JLabel” will match any label that has a JPanel parent. “JPanel > .style2 > JLabel” will match any JLabel having a parent with the “style2” style class, which in turn has a parent that is a JPanel.

The adjacent sibling combinator “+” is used to test the component immediately preceding the one being tested. “JLabel + JPanel” will match any JPanel that has a JLabel sibling immediately preceding it in any parent.

The general sibling combinator “~” is similar but applies to any preceding sibling, not just the one immediately preceding the component being tested. “JLabel ~ JPanel” will match any JPanel having a JLabel sibling before him, regardless of its position.

Adding “,” is equivalent to creating another query and doing an union of the two result sets. “JLabel,JPanel” will match JLabels and JPanels. “:not(JLabel,JPanel)” won’t match any JLabel or JPanel. And so on.

Looking at the unit tests you’ll be able to see real Swing panels and components being created and queried (and with a nice “JPanel.HPanel#h1[name^=h] > JPanel:not(.HPanel):nth-child(2) JLabel.HLabel[name^=l][visible!=true][text*=Hello]:only-child:first-child:last-child” query for instance)

License

Since I ported some of Sizzle’s regular expressions, I’ve included its BSD license. Shizzle itself also is released under BSD, as usual.

Next steps

This project definitely needs more documentation and tutorials.
Right now, there’s very little error handling at the query syntax level, and definitely needs to be improved.

I’d also probably add a visual tool to test queries on a live UI some time in the future.

The performance could be enhanced, even if it’s good enough for my uses. Right now the whole Swing UI is flattened into a list, which is then checked for matches. The matching could be done while traversing the tree for most of the selectors, so there’s another nice improvement to memory usage that could be done here. The queries could be cached, and modified or invalidated when components are dynamically added, etc

I’m currently looking at scenegraphs, to replace Scenario. So far I’ve “ported” (hacked) Pulpcore to the desktop (removing the dependencies on Applets), and tried Piccolo2d. So expect Shizzle to be ported to one of those, or some other scenegraph, when I find the one I want to use.

Maybe it’d be interesting to port it to other platforms such as Android, or to other toolkits, like SWT or Pivot.

Of course, extensibility for parsing, microsyntaxes, operations and so on, is definitely something that I’ll do too.

Conclusion

Shizzle comes with quite extensive unit tests (which wasn’t that hard, since it was TDD’ed), that show you running examples, and make up a little for the lack of docs. I also “ported” a subset of the official CSS selector spec test suite, with all this I’m confident it works nicely.
You can also look at a subset of HTk, a set of API wrappers which we’ll talk about in more detail in the future, for now let’s just say it contains methods to help set the name, the style classes, etc (the HComponents themselves are not added to the Swing hierarchy, they’re just builders of JComponents).

Here’s the zipped Eclipse project.

I’d love to get feedback on this, you can find me at twitter.com/lqd.

Uncovering an invisible button on the iPhone, with sound

I’d like to explain the idea I had last summer on how to “add a new button” to the iPhone, thanks to the microphone, as an interaction design mockup. I initially wanted to do that in an article dedicated to interaction design strategies for iPhone games, but it doesn’t look I’ll be able to do that soon, so here goes the 1st of them. It’ll be clearer than 140 characters at a time on twitter.

I thought about this a week after Sonar Ruler (the site was down when I tried to find a link, so here’s a demo on Vimeo) was released. This app made me think of other uncommon uses of the microphone. While using your voice has become a 1st class citizen in the interaction landscape (or close to it) probably starting with Science-Fiction a while back, I was trying to focus on sound in an indirect way, as a side-effect or by-product of the interaction.

The “Sonic Button”

I never really thought about a name for this, but SonicButton and sonic tapping is probably descriptive enough (suggestions are welcome and appreciated).

The concept, as the name and the title of this post suggest, is using the microphone to listen to the sound of interactions with the iPhone, effectively turning it into a button: listen to taps, and especially taps made using a nail. The great thing about this is it works anywhere on the phone: front, back or the sides, the whole surface is available for the interaction. In turn, this allows great flexibility for the users, any finger can be used, in any orientation, you handle the phone regularly and use the finger you want to tap wherever you want. You can even tap with the nail on the screen itself, and not register a finger touch. As I said, the *whole* surface is available for you to use.

Of course, this is applicable to any phone and not just the iPhone, provided it has a microphone (pretty much all of them except the ones used by mimes) usable from an API (far less common). Android comes to mind as an additional platform, and surely you could name others. However, I only tested the microphone behavior on my iPhone 3G.

Mechanics

While I’m not an iPhone or Android developer (yet) I did the best I could to test this theory by using existing applications. I used the SoundMeter app to see how the microphone reacted to this interaction, under different conditions: portrait and landscape orientations, holding the phone with one and two hands, for regular use and games (where the grip is usually different), and in calm and noisy environments.

The typical sonic tap will obviously manifest itself as a short spike in the audio stream. Depending on the noise conditions, where and how you tap (with the nail or a fingertip), the intensity will of course be different, but in a calm room, hitting with a nail, I usually get between 25 and 35 dB for a soft-to-regular-strength sonic tap.

Something interesting happens using a “game grip” (your hands, thumbs and 1st fingers pretty much covering every side of the phone). The microphone is obstructed and picks up sounds at a high level (80-90 dB, out of, what I think the maximum is, around 105dB or so). Even here, with the microphone completely blocked, a sonic tap registers a spike in I believe the same way as people hear their own voice, even when they block their ear canals with their fingers: with sound travelling through the skull rather than from the outside in (note: my biology knowledge is pretty limited, so this might be wrong). Here I think the sonic tap travels inside the phone and the mic picks it up.

This is actually something that can be taken advantage of, in a noisy room, where a sound spike coming from the environment would be considered a sonic tap, you can block the microphone deliberately and still use this interaction.

Analysis

To my eyes, the most interesting part of this is the fact that it allows to interact with something other than the screen. Even though it’s only one button, the fact that it’s a button that can be used without obscuring the view is really nice.

It’s also a discrete and simple event, and in that sense would be far easier to use than the accelerometer for instance (which depending on the use case can be seen as rather imprecise, and breaking down when using it for two dimensions). It’s not that it’s hard to tilt your phone, it’s that it’s hard to tilt just the amount you need to do what you want, (said amount is also app-dependent), whereas a tap is a tap, in every app. Sure, the variety of the environments, of the implementation thresholds can turn this into the same non-deterministic behavior, but a strong sonic tap should generate a high-enough spike to be detected in most implementations. We’ll see.

Just like with the accelerometer, a problem is that it would probably require calibration to match the user’s behavior and environment, even though sensible defaults could be chosen regarding strength, and an app could detect a noisy environment and take appropriate action, be it changing thresholds or notifying the user to switch his grip for instance.

It’s also about as hard to discover as it gets, otherwise I wouldn’t be talking about it. However, I don’t feel discoverability to be such an issue, the usual in-app “tutorial” solves those kind of problems with ease most of the time, and even if it’s rare to see them in utility apps rather than games, any app with a different enough UI offers one.

The initial (really short) learning curve passed, I feel an interaction like this one would be fun and useful, and should offer a great experience to the users, which is what the iPhone spirit is all about.

I would see this being used in immersive apps (like games and such) for local consumption only, ie I don’t think it would be useful to broadcast the sonic tap event over the network, other than maybe if you wanted to do a mini-drums simulator that’d work remotely from the back of your phone, or a human metronome, who knows.

The possible interactions

The most common way to hold a phone is (in my own experience, and limited testing with real people) in portrait mode, with one hand. This can be seen as a vertical handling of the position called “the dealer’s grip” in the card-playing world. In this position, the 1st finger is almost not used for holding, resting most of the time close to the lock button (using the left hand; this button is not located here by chance) or on the back (and probably not lower than the Apple logo) while the others are touching the sides. This is the simplest case to hit the SonicButton, on the back side of the phone. It’s also possible to use the 2nd finger, however it’s not as comfortable, so it didn’t look as good a choice in my tests (I only tested with a handful of people, though). As I said before, letting the users choose will end up naturally on the most comfortable choice and position for them, in practice I found this to be pretty powerful.

Using both hands in portrait mode can happen when the user is typing, on the web or writing a mail or SMS, and only if the user is skilled at typing on the virtual keyboard (the small number of beginners I know type approximatively the same way, by holding the phone with one hand and either hitting the keyboard with the holding hand’s thumb or with the 1st finger of the other hand. The latter being more common, and this also held true for the ones having a phone with a physical portrait keyboard, sliding up or down, or with clamshell phones). In this position, a very interesting situation comes up where you can still use your thumbs but hit the glass *under* the screen, at the left or right of the Home button. I did say you could sonic tap anywhere.

In landscape mode, people rarely use it with a single hand, but it can happen. If the user’s holding the phone and not interacting with it, reading or watching a movie, his fingers aren’t in front of the screen and he can sonic tap on the back. If he’s interacting with the phone, it’s usually with the thumb and here a sonic tap to the sides of the screen around the top speaker or home button, or once again on the screen with the nail only, is doable. In practice, I didn’t see this behavior in my limited testing. Still works if you do use it that way.

When they use the phone with both hands in landscape mode, the grip matters (in blocking the microphone) but basically you can sonic tap with your thumbs on the sides of the screen on the front, or with your 1st fingers on the back of the phone. Using the “game grip” you can also use your 1st fingers on the top edge, or depending on the user’s dexterity the 2nd fingers on the lower part of the back side, close to the bottom edge.

As with regular taps, you can have a multiple sonic taps, even though I suspect filtering will modify the way to detect the following taps.

What’s also interesting with this, is it allows eye-free interactions like a real physical button, even though the environment noisiness could be an issue, a double tap might be the gesture to use. It’s not that interesting in practice because it’d mean an app would have to run when the phone is in a pocket, unlocked, and with the microphone and sound processing the battery probably wouldn’t last long.

Implementation

As this is an interaction concept, the only pointers I could give would be the Audio Queue Services inside CoreAudio, for the iPhone, and also Stephen Celis’ sc_listener which seems to be the perfect candidate for the job.
I don’t know if you can get a live stream on Android, but the AudioRecord, MediaRecorder, and this tutorial certainly could be a start.

In conclusion

This sonic button is closely related to Chris Harrison’s ScratchInput: I actually read his project page when it came out, and I remembered it and looked it up again after coming up with this. The mechanics are roughly the same and use the exact same principles, but in ScratchInput the listening to scratching on surfaces is done via custom hardware (because scratching is a lot softer than tapping), and could be adapted into mobile phones, turning them into passive listening devices (that can broadcast data over the local WiFi network) used to turn a regular surface into a scratch-enabled one; whereas in what I presented here, the interaction is focused on taps and happening on the phone itself (and not a wall or desk) and the input data is actively used by the iPhone and its apps to enable new features. So in my mind, they’re really close and part of the same interaction family, but I wouldn’t say they’re exactly the same.

I’d love to get feedback on the concept, you can me find a twitter.com/lqd.

Mockup for short links on Twitter

And now for something a little different: most if not all of my posts here have been code-related even though a big part of my work and interests are design-related, something with which you might be familiar if we’re friends on twitter

Recently Chris Messina offered a suggestion on how Twitter could better integrate short links.

Chris' proposal

This prompted me to summarize my thoughts on the problem they introduce in the UX. The Twitter Fan wiki page on short links explains those technical and design problems, and lists current practices and alternative solutions, including the one I’ll present here today. Even though I’ll offer several different ideas, they’re sequential in my mind. I see them as different versions of a solution, as part of the design process, rather than different solutions.

For reference, this is how Twitter displays links at the moment.
short links on Twitter right now

The most obvious thing to do is integrate expansion on demand as exists on the Twitter search (ex-Summize) page. The version A is exactly that.
expand Button version A

The version B is a modification I made to make the expansion process secondary (and it’s the one I use at the moment in our own unreleased client, but this will change).
expand Button version B

The expand buttons (possibly underlined) would be slightly transparent in order to blend in better but would have full opacity on mouse hover.
However those 2 versions only show the information you’re looking for when you interact with the expand buttons. This interaction is pure excise.

So, the next version, “With Host”, adds feedforward on the short link by showing the host/domain it points to. It’s only slightly better, but offers reassurance if the site is one you trust and visit frequently.

Showing the domain

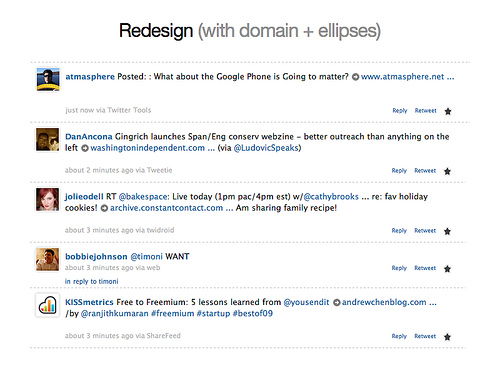
However, in my mind short links are a hindrance to the experience and shouldn’t be a focal point in the tweet — the real links are actually more important in the message. The next version, “Inverting the polarity”, keeps the feedforward of the previous version, but shows more info and puts the expanded link in the tweet itself. The short link being relegated to the sideline here.
The expanded link inline

I strongly think the expanded URL shouldn’t be shown fully here, the links people shorten are often huge; they would offer little added value (what can you tell from a 150-character link you couldn’t from a 100-character one), they’d mess up the layout, etc. So only the first X characters would be shown, say 20 or so as I used here, and an ellipsis if the whole URL was cut off.

Continuing in that direction, the last version “Bye-bye short link” removes the obscure short link from the main content altogether.

Bye-bye ugly short link

In those last 2 versions, you could add an expand button (I originally designed the ellipsis to be this expand button but I feel it’d be a hard-to-hit target—even with more space between the link and the ellipsis, which is not shown here—but I don’t think we’d need one, for a simple reason. There already exists an interaction for knowing where a link points to: put the mouse cursor over it, and look in the browser’s status bar. Of course, just adding this to the other versions (including the one Twitter uses) would shed some light on the short link black hole, even though hijacking the status text like this has to take accessibility into consideration.

Of course, a tooltip window similar to Chris’ could be another direction, however I feel that just using “link” could be seen as giving even less information than the already obscure short link.
It could go really well with the ‘Bye-bye short link’ design, where the tooltip window would show the original short link url (and who knows maybe also some stats, even though I suppose they’re probably only used by a tiny fraction of people)

I don’t feel the URL expansion being slow is a problem, provided it’s done *before* showing the tweet in the timeline. Be it on the twitter.com website or in a client, I believe users have no easy way to tell they received a tweet 30 seconds later than they were “supposed to” (this could be the maximum timeout allowed for the URL expansion to succeed). If the link wasn’t already expanded in the tweet (last 2 versions), the Summize style expansion would here be immediate.

Even though my personal opinion has no value compared to user testing, removing the short link altogether is my favorite :) These different versions all evolved into removing it, and this last version represents my current thoughts on the problem.

Shortly after I tweeted this, Chris came up with another redesign blending several ideas. I’m happy with the direction and feel we’re getting somewhere interesting.

Chris' redesign

I’d love to get some feedback, tweet about this using the #shortlink hashtag. You can find me at twitter.com/lqd

Custom GLSL/HLSL pixel shaders for Java2D, Swing & JavaFX

Introduction

Welcome to part 2 of our experiments on hardware accelerated effects in Java. Today’s weather forecast: 70% chance of… pixel shaders.

Remember last time, when I said I wouldn’t probably do custom effects and would wait for Sun to provide it to us ? Well…

I lied.

Actually, I changed my mind, but let’s not argue semantics here :]

We’ll see two things in this article. First, we’ll generalize what we did last time and get something usable from plain Java2D, and use that in our Swing support classes. And secondly, I’ll show you how to make your own custom effects/pixel shaders in GLSL & HLSL.

Before we start, a disclaimer: like a lot of the things I do around here, this is going to use some internal APIs, so 1) they might change in the future, 2) I might use them badly (as I think I did in the previous article, it should be cleaned up now hehehe) – 3) there are some things I don’t understand in the APIs, after all there’s so much I can do with undocumented bytecode and without the source really, 4) all this is possible thanks to an ugly hack I won’t bother explaining, because it’s not really interesting.

That being said, I did my best to hide the ugliness behind easy to use API. I can’t be sure this code will work in future releases of Decora, or if it would be doable to adapt it then, though. If that happens, let’s hope Sun provides an officially supported way for custom effects and pixel shaders (which could be as simple as giving access to decora’s compiler and JSL, as I said last time).

Java2D & Swing

There are now 3 ways to use decora effects: 2 for Java2D, and one for Swing with help from JXLayer (which, of course, uses the Java2D ones).

The first one is DecoraEffectRenderer and allows you to draw an Image with an effect applied, on a specific Graphics. This class delegates rendering to some decora utility methods I found not long ago (and might not have been present in decora when I initially wrote this experiment, last december), and renders manually when those can’t be used (“context hijacking”, which I use in the JXLayer support – ie when applying effects on non Java2D-managed images). It contains 3 or 4 drawImage methods (that mirror the ones in Graphics2D). The second one is DecoraEffectImageOp, which as the name suggests is a BufferedImageOp implementation. Those two classes should help you use decora almost like you use Graphics and software effects today in Java2D, so pretty familiar territory for you if you’re reading these lines. The last class is the JXLayer DecoraLayerEffect, from last time, but now just uses a DecoraEffectRenderer internally.

Custom effects / pixel shaders

And now on to the good stuff. Even if the basic concept was easy to code after I got the idea on how to do it, the longest part was coming up with a coherent API I wouldn’t mind using, making sure it worked with GLSL, HLSL, on windows and linux (both using java 6), and so on (unfortunately i couldn’t test on a Mac, I have hopes it will work there, but I have no idea – I think the closest i can get to the Mac environment is java 5 under linux, but decora/JavaFX only run on java 6 there, since they rely on the RSL).

I also want to note the work I did here needs signing in webstart, a requirement I have high hopes of removing when Decora/JavaFX 1.2.1 is released, because of a bug that was recently fixed there. Unsigned webstart is not really a hard requirement for me, but it might be for you. In any case, the method I use for hijacking shaders into decora works unsigned; some files will need to be moved around, but I think that’s basically it. We’ll see how it goes when I can test it, and see if i’m right.

As I said last time, decora has a number of backends because it runs on quite a diverse set of platforms/hardware/software/gpu drivers/etc. What I did here is basically a small subset of what the decora compiler does: only for the gpu backends, and requires manual coding. With JSL you’d code a single file describing your effect, and have the compiler generate all the support classes; here we’ll need to do “everything” manually, and I’ve succeeded in making this task pretty small: one java file, and two pixel shaders, for OpenGL & Direct3D – and of course one of those might be optional, depending on your target platform. For an effect called X, you’ll have in the same package X.java, X.glsl and X.obj (compiled from an HLSL file, using the fxc tool that comes with DirectX SDK)

Let’s see how to make a custom effect. We’ll stay at the global overview level, assuming you can read my code, samples and demos for down and dirty specifics if need be.

As JFXLayer has shown, we’ll need a class extending decora’s Effect. Here to create your custom effect, you’ll extend a helper class I did, called, you guessed it, CustomEffect. And it’ll basically look like this:

Custom effect structure

public class BlingBling extends CustomEffect<BlingBling>
{

// TODO: insert bling here

// ----- Bling controlling -----

@Override
protected Class<? extends ShaderController<BlingBling>> getShaderControllerClass ()
{
        return BlingBlingController.class;
}

public static final class BlingBlingController
   extends Abstract/*Stuff we'll talk about later*/ShaderController<BlingBling>
{
    public final void updateShader (BlingBling effect, Shader shader)
    {
        shader.setConstant ("bling", effect.getBling());
    }
}
}

Hello less-readable-but-safer-because of/thanks to-generics code. Most of this will be generated by your IDE anyway.

The BlingBling java class is the effect implementation. You’ll create instances of this, pass them to DecoraEffectRenderer or DecoraLayerEffect, set parameters, variables and so on. The inner class is the shader controlling part, ie setting variables on the shader, whose values are coming from the BlingBling effect itself. Pretty clean and simple for something that’s quite complicated if you think about it really.

Shader controlling and the shader itself

The shader controlling is grouped by the number of samplers the shader uses: 0, 1 or 2 – because that’s the way decora does it. The shader controller will most of the time extend Abstract[NumberOfSamplers]ShaderController: AbstractZeroSamplerShaderController, AbstractOneSamplerShaderController, AbstractTwoSamplerShaderController. The whole hierarchy is more complex, there are other abstract classes and interfaces you can extend/implement, those are the ones that provide the most help, but you can read the code and figure this out yourself, it’s pretty simple.

Let’s start with what’s common between all of them, the shader structure itself. I won’t obviously explain anything about coding pixel shaders here, and only focus on what’s needed to use and create your own.

I’ll say that there’s more flexibility when using GLSL code – because they can be parsed, composed, and messed with at runtime, which is not easily doable with HLSL – and I’ve called this “prettify-ing” the shader. A “pretty” decora GLSL shader will look like this, a regular GLSL shader:

// bling related variables and samplers

void main()
{
 // bling computing using the mentioned variables and copious texture2D calls

 gl_FragColor = bling;
}

While a real decora GLSL shader actually looks like this:

uniform float jsl_pixCoordYOffset;
vec2 pixcoord = vec2 (gl_FragCoord.x, jsl_pixCoordYOffset-gl_FragCoord.y);
uniform vec2 jsl_posValueYFlip;

vec4 jsl_sample (sampler2D img, vec2 pos)
{
    pos.y = (jsl_posValueYFlip.x - pos.y) * jsl_posValueYFlip.y;
    return texture2D (img, pos);
}

// bling related variables and samplers

void main()
{
 // bling computing using the mentioned variables and copious jsl_sample calls

 gl_FragColor = bling;
}

As you can see there’s a little more boilerplate, and the helper classes basically turn the pretty GLSL shaders into the regular ones. Prettifiying GLSL shaders is optional (but is set to true by default), and also comes with a perk, you don’t have to tell the shader controller the names of the samplers (unless you want to or need to control the IDs), something you have to do with regular decora GLSL & HLSL shaders.

The HLSL shader will look like this skeleton:


// bling related variables and samplers

void main (/* TEXCOORD0 UVs for each sampler */, in float2 pixcoord : VPOS,
   inout float4 color : COLOR0)
{
 // bling computing using the mentioned variables

 color = bling;
}

This is how you’d compile that last HLSL shader to an obj (you could use another file extension if you wanted to, like the more common .ps – but decora uses .obj and that would be mandatory for sandboxed access, so I’ve let it be the default): fxc /nologo /T ps_3_0 BlingBling.hlsl /Fo BlingBling.obj

Now you know why decora (and thus JavaFX) requires a graphics card that supports at least the Shader Model 3.

*-sampler shaders

Let’s look at the different types of supported shaders & shader controllers, what they are useful for, and talk about the included samples, which will show you the exact pixel shader structure you need to follow here.

One-sampler shaders are probably the most common ones, as they represent the kind of effects used in image processing. I provided a sample effect, a basic clone of the SepiaTone decora effect, imaginatively called SepiaToneClone. [Abstract]OneSamplerShaderController offers a way to get the sampler’s name, and whether it is using bilinear or nearest neighbor filtering. To give you an idea, in Decora, the blur, brightpass, and color adjustment effects are all effects using one sampler effects. These shaders would be useful if you wanted to implement some image processing effects for instance, such as the ones you find in Jerry Huxtable’s jhlabs filter library.

Two-sampler shaders, most of the time either mix the two source images, or use one as parameters to apply an effect to the other input image. [Abstract]TwoSamplerShaderController also provides a way to get the samplers’ name, and the filtering to use. Examples of these in Decora are the various Photoshop Blend modes and displacement map effects. I provided a sample effect for that too, which is a clone of the multiply blend mode. These shaders would be useful if you wanted to implement transitions effects for instance, such as the ones you can find in Jeremy Wood’s transitions/transitions2d library.

And lastly, zero-sampler shaders. These, I think, would be the kind of shaders you’d use for procedural textures, like the ubiquitous checkerboard or brick patterns, or the Mandelbrot/Julia fractals for instance, up to the more modern procedural shaders you see in some farbrausch productions (like .kkrieger/.theprodukkt), the game Spore, or the Substance Air tech from my compatriots Allegorithmic. In practice, however, and the reason why I just said “I think” is because you’d probably need UVs for anything worth looking at, and I’m not sure if that’s provided in decora here, since there are no zero-sampler effects in the whole library. That’s why I didn’t provide any sample here, and I started doing my own procedural shaders using one-samplers. So your mileage may vary here.

The java code for the effects, shader controllers & glsl and hlsl shaders (provided in the zip at the end of this article) will probably need to be looked at in more detail to really be able to make a custom effect, but the basic principles have all been described here, and you should be good to go.

Animayshion, man

While the pixel shader support is blazing fast for static images/UIs, be sure to test your target platforms thoroughly if you’re intending to animate those effects, there’s a lot of image data moving from the cpu to the gpu and back here, complicated effects become slow on big images or live UIs because of that. With great power comes great responsiblity, as the great philosopher once said – or maybe it was spiderman, i’m not sure.

I think/hope that the Prism renderer, coming in the next JavaFX release, will solve that. The public info on this is that it will add image caches for any node in the scenegraph: those being on the gpu, animations and pixel shaders should be faster. I’m not sure however that it will allow custom shaders, I doubt it to be honest, and this is part of the reason I changed my mind and coded it myself, however bad and inefficient my code would be – taking into consideration the conditions under which I’m doing this. Plus, Flash (in a sense) and Silverlight already offer this, and I find this lacking in the Java world – Java2D/Swing, not JOGL obviously.

JavaFX support

As for JavaFX support, I’ll start with another disclaimer: I don’t do JavaFX script at all, so take this code with a pinch of salt; if anyone wants to improve it, or correct it because it’s most likely bad, let me know (not to mention I mostly succeeded in crashing the openjfx compiler with those 10 lines). It works like this, you do what’s needed for general java support, and also create a JavaFX class extending my javafx.scene.effect.custom.CustomEffect, to specify and control the custom java effect. This will allow you to use your JavaFX effect like the regular ones.

An example JavaFX effect using the SepiaToneClone sample effect:

package javafx.scene.effect.custom.sepia;

import javafx.scene.effect.custom.CustomEffect;

public class SepiaToneClone extends CustomEffect
{
    public var level : Float = 1.0 on replace
    {
        delegate().setLevel (level);
    }

    protected override function createDecoraEffect() : com.sun.scenario.effect.Effect
    {
        return new org.hybird.decora.effect.sepia.SepiaToneClone();
    }

    function delegate() : org.hybird.decora.effect.sepia.SepiaToneClone
    {
        return decoraEffect as org.hybird.decora.effect.sepia.SepiaToneClone;
    }
}

Crappy demos

I can’t write an article without demos, you know that by now. Unfortunately, they won’t be particularly impressive today, since the point of the article is to show how *you* could do pixel shaders. The sample effects I coded, being mostly clones of existing decora effects, won’t be really new obviously. In any case, here they are, the first one uses the decora renderer to apply a clone sepia color adjustment on a screenshot of the displacement map test demo I talked about on twitter.

ImageProcessingDemo

Launch the Image Processing demo

The second uses the JFXLayer decora effect and is once again a simplified version of JXLayer’s LockableDemo. Here, a gaussian blur & the clone sepia color adjustment are applied on Swing UI when locking the panel, using the blend multiply clone.

SwingUIDemo

Launch the Swing UI demo

And the last one, is a JavaFX text label over a blue rectangle to which the sepia effect is applied. Clicking will lower threshold. Seriously impressive stuff, i expect George Lucas to call me for help on the next Star Wars, based purely on the aesthetic of this last one. True story.

JavaFXEffectDemo

Launch the JavaFX Effect demo

(Famous) Last words + Download

Of course I wanted to provide more polished demos, with a GLSL editor to play with, for instance, but this article is already getting too long, and I don’t have any more time to make it shorter, or longer – I want to finish it quickly to keep my incredible one-post-a-month average.

Some time in the future we’ll probably see how to make a custom effect that’s actually useful, most likely from one of the “These would be useful if” ones I mentioned here, a transition for example. *Those* would be/will be worth demoing.

You can find the whole project here, with all the support classes, samples, shaders, etc (the whole shebang is under BSD as usual).

Till next time, take care. By the way, you should follow me on twitter here.

PS: this is why I only post once a month, I think I actually aged while writing this 2500-word long article :]

Hardware Accelerated Effects in Swing with JXLayer and Decora

Update (August, 31st): I released version 0.2 of this library, fixing a couple of problems, and adding the possibility of making your own custom pixel shaders. You can find the second part of this series on pixel shaders here.

The Olive Branch

A lot has been said about Swing and JavaFX recently, in a seemingly unending flame war between fans of each side. Both have merits and flaws, and as you’ve seen over time, i’m advocating a 3rd way, which i decided to pompously call The Olive Branch for no reason whatsoever, which is using the best of both worlds.

The plan is to use, directly from java, scenario and decora -the graphics libraries that power the javafx runtime, and which i love probably more than my girlfriend, but don’t tell her (: – (btw if you don’t like crappy jokes, you better stop reading now, and grab a taco or something) . Of course, things have changed since their release, what was once an open source public API (albeit destined to change heavily) is now an internal proprietary one, which means danger, will robinson. So, the plan is to have the community build things that are so cool, and innovative, that Sun will allow us to do just that and make scenario/decora public and usable from java, as they said they would, like with a jnlp extension or something. I think when things have stabilized a little, they’ll get to it. But at the moment, i have succeeded in doing that, at a level of 2% (and i’ve mailed Sun telling them everything i’ve done with scenario in the last 18 months – which is quite a bit in retrospect). Let’s see if we can crank that baby up.

Introducing jfxlayer

I’ve started this a long time ago, i wanted to help people use scenario and decora in swing, not only in a pure scenario scene as with Scenile, but from regular, real world swing, because some tasks are better handled by scenario and decora, and vice versa. The best of both worlds. I never got around to releasing it because i haven’t gotten to a satisfying point in this endeavour (+ i’m lazy), i’ve just planned the whole shebang, and coded the first little step, how to use hardware accelerated decora effects in plain old swing. It’s like 30 lines of code, that i kept in sync with every JavaFX release. I’ll get to the other planned features eventually, in the meantime, here’s the result of this piece of work. Hopefully, it’s interesting enough for regular Swing java users, or more “exotic” ones, like them groovy folks (:

It’s almost nothing code and work-wise. However, this opens a *huge* realm of possibilities for swing apps, and i hope you’ll see that too.

The concept is simple: add decora’s effects to the BufferedImageOps effects that jxlayer allows.

Decora. OpenJFX. JXLayer. JFXLayer.

Decora ?

Decora is Chris Campbell’s baby, if you don’t know who that is, you can stop reading now, bye. This library is arguably the smallest, the easiest to use and most powerful one you’ll ever come across if you’re dealing with effects, image processing, and shaders. A decora effect is made with a JSL file (Java Shader Language) which is basically a mix between Java (in order to get/set parameters and control the effect) and GLSL/HLSL ie, a generic high level OpenGL/DirectX shader language. This JSL file is then “compiled” (by a code generation utility) into a specific effect for each supported backend. The backends are mutually exclusive branches of code that target a specific architecture/3D API, etc. Depending on your software and hardware configuration, decora will choose the backend that will perform the best on your computer, whether you’re on windows mac or linux for instance. You have a regular “software” backend in pure java, one using JNI, one targetting OpenGL, another one OpenGL ES2 for mobile devices, another one Direct3D, and one targeting Prism, the next gen JavaFX graphics renderer, which will allow 3D and more perf, which is about as far as everyone knows. Back in the open source decora days, i’ve also written a backend myself, which multithreaded the regular Java backend, so that effects would use all your available cpus/cores.

All that from one tiny JSL file, they really are small, check the old open source version you’ll see. For the user, it’s of course transparent, you create an instance of the effect you want, and use it, decora handles the rest behind the scenes.

Sure, there aren’t that many effects yet (in fact there haven’t been any new ones since it was released, the work is done on the architecture, perf, backends, for the existing effects, which is very logical if you think about it) compared to, say, what Jerry Huxtable offers in his jhlabs filters library. In practice, it’s enough, for instance you have blurs and shadows, a perspective effect (think coverflow), color transforms, etc and a way to mix and chain all of the effects. If we had access to the compiler (or if we reverse engineered and forward ported that to the open source version) we could add new effects, but it’s not the case anymore. I think it’s doable if you really want it, especially for GLSL shaders which’ll be very interesting once Prism is released, if the compiler isn’t available at that time. I haven’t felt the need to create new effects until this week where i needed a better displacement effect than the one provided. So we’ll see how it goes but i’m not planning on doing it anytime soon.

How do i use it in swing ?

Enough about decora. In your Swing app, use JXLayer, and use the JFXLayer effect bridge with stock decora effects. It’s very simple:

BufferedLayerUI ui = ...; // your regular JXLayer LayerUI
Effect decoraEffect = ...; // your regular decora effect
// like GaussianBlur, Bloom, DropShadow, etc
ui.setLayerEffects (new DecoraLayerEffect  (effect));

Compare that with using JOGL and pixel shaders directly as Romain did in the Filthy Rich Clients book (the sample is like 500 lines long, and which are mostly low level code for setting everything up for rendering, here it takes 5 at most, thanks Chris!)

Demos. Finally! I’m as tired reading this awfully long blog post as you are writing it

I know you’re all about demos and eye candy, and today, i have 3 of them for you. Not one, but three, and if you call right now with your credit card number, i’ll add a set of Ginsu2000 knifes for only 3 easy payments of 9.99$, they can cut a shoe, you know ?

Since this post is about hardware accelerated effects, you’ll obviously need a decent graphics card with up to date drivers.

basicdemo

Launch the basic demo

The first one is pretty basic, it’s two buttons. Pushing each one starts an animation (using the same code that powers the eMotionBlur demo of last time) that progressively blurs the component (but remains live). The button on the left is using a jhlabs blur filter, while the one on the right is using decora’s one. At the default size, it’s really close, but maximize the window and you’ll see the difference, and possibly start to envision the possibilities this offers. Who knows maybe it can be used to power screen transitions (even though i’m still not fully satisfied with the perf yet – maybe Alexander Potochkin, or Dmitri Trembovetski can help us out here, pajalusta (or whatever it’s spelled in cyrillic (: – you’ll see it’s decent enough for me to release it) – Mark, you can keep us updated on that (:

lockabledemo

Launch the LockableUI demo

The second one is a modified demo from the JXLayer distribution, using the LockableUI, here also you can compare blurs. On my machine it’s almost instantaneous with decora.

twimber2demo

webstart

And finally the 3rd one is a modified version of Twimber, my tiny twitter provider for Kirill’s great Amber project. I’ve hacked animated blooms, blurs, and color transforms into it in a matter of an hour, where it would have probably taken me days fiddling with jogl. Bear in my mind this demo is *heavy* with animated effects, and absolutely not optimized at all (for instance the repaints are too big, the effects target components that are too big, etc) and might run slowly (it does a little on my machine) or quite possibly crash your vm (which it does on another machine, probably a bug in my graphics card driver that crashes everything), plus there are some deadlocks somewhere between Amber and the latest releases of Trident, that i haven’t tried to remove, maybe Kirill can help us with that, if need be. If that happens, you can only close the webstart window by killing the process, sorry about that, guys. Hopefully, we fixed the problem, it stll won’t be optimized though ^^

Is it safe to use ?

Sure, using internal APIs is going to be a pain in the neck, it already has been for me. But, all in all, Decora’s API did not change much in the last 18 months, and especially not the effects’. And as the saying goes, no pain no gain. Plus they work fine with JavaFX 1.2 and JFXLayer right now, you don’t have to use the next version if you don’t want to have to modify them.

Downloads and source

Update (August, 31st): As mentioned earlier, I released version 0.2 of this library, fixing a couple of problems, and adding the possibility of making your own custom pixel shaders. You can find the second part of this series on pixel shaders here. I didn’t change the code linked here for archive purposes though.

You can find JFXLayer here (zipped source project + demos), and twimber2 here (zipped source project).

Let me know what you think, if the demos run well, or whatever in the comments, or sooner on twitter.

Animation speed and dynamic motion blur in Swing with JavaFX’s Scenario

Introduction

In the last article about triggers, i mentioned a use case which was very interesting to me, and would allow handling the motion blur automatically in an animation. This pretty simple addition, as you’ll see, makes a big difference in the dynamism and realism of an animation. Let’s see how to do that. And of course, there’s a hopefully cool demo+source that comes with it.

Speed (instantaneous speed) is easy to calculate: it’s a delta between two values, divided by the delta of time it took to get from the first to the second value. (We often think of the values in space, for motion, but this formula ca be applied to any dimension, since it relates to the speed of any change). Cue timing events, and all you have to do is find the difference between the last value of the property you’re animating and the current one, and the difference between the times at which the events occured.

float delta = Math.abs (currentValue - previousValue);
long deltaTime = elapsedTime - previousElapsedTime;
        
float speed = delta  / deltaTime; // speed per ms

I said it was going to be easy! Plus i’ve built a speedometer class to help you with statistics, filtering events, and calculating the speed.

Once you have the speed, you need to find a way to use it. What i wanted was a relationship between that speed, and the motion blur itself: the faster the animation, the bigger the motion blur radius.

We’ll tackle the specific speed trigger next time (because i thought about it a little more, and the concept is pretty powerful. Triggers shouldn’t be in an animation library but directly in the core libraries or in a ui tk, at the very least, so next time we’ll see what i came up with), today we’ll use a component of that equation to make a fully dynamic motion blur: we’ll use the delta values as a basis for the blur radius.

Demo

The demo looks like originally like this.

The basic demo

Not much going on. There’s a white surface on which the animations take place. It comes with 3 presets. Each preset launches an animation with a different duration and spline interpolator (which changes the speed for each one), the text goes from top to bottom. You can also click the surface, and the text will smoothly move there, motion blurred and all (look at the code to know how to calculate an angle involving a mouse click).

You’d be impressed by how fast a little animation goes; in the demo, some of them go from 0.3 to 29k+ pixels per second. Obviously with that much of a gap, it’s almost impossible to get to a good looking animation by hand coding and eye balling. I had to build a little editor to make the presets i just talked about. It’s activated by clicking the “animation editor” button, no kidding, and looks like this.

emotionblur-editor

The editor obviously allows you to change everything in the animation, from the text, its color (using jeremy wood’s colorpicker), font (using connectica’s font picker), the motion blur settings (used here by the play button, or when clicking on the white surface), to modifying the spline interpolator (using a slightly modified version of the one romain guy did in the timingframework, to adapt it to scenario and other things) by dragging the round anchors or using the template selector, and also allows you to see the actual graph representing the animation speed, if the animation were to be run with the current settings.

Try the demo, i think it’s cute, note however that hardware acceleration is going to be a must-have here. There’s really no way you can animate a 60px radius blur effect smoothly and easily without it

webstart

Download the source (zipped eclipse project) here. The stuff i wrote is under BSD as always.

PS: The demo is using the scenario library that powers JavaFX. I’ve used the recently released version 1.2, which should work on all platforms, but i’ve only tested it under windows and linux so your mileage may vary. The demo’s name was in direct relation to the mythical 4th preset (which you can see in the screenshots but only try if you download the code), blurring emotions as well as pixels on screen, you can think of that as poetry if you will.

My own emotions were actually blurred too when updating to v1.2, since a lot of things i relied upon in the scenario framework since its public release 18 or so months ago, were either moved to fx script or removed altogether. I’m slowly bringing them back to life, piece by piece, i’ll make a post about using scenario 1.2 in java in the near future, and maybe win the 500$ sun is offering for their latest blog challenge in the process hehehe (:

Let me know what you think here or on twitter.
See ya.

Swing event triggers for Trident animations

Trigger happy ?

Starting and stopping animations is usually related to events occuring somewhere in your ui. Writing those event listeners can be verbose and tedious at times. Chet Haase (one of the great, we miss you buddy) solved this problem in his TimingFramework animation library by providing a small core of extensible classes dealing with events: triggers (example here).

They allow you to say: start this timeline when the user interacts with this button, or start this timeline when the mouse enters that component and reverses it when it exits, and so on.

While testing Kirill’s Trident library, i thought this feature could be nice to have, so i ported Chet’s trigger code over to support it.

Meet the cast

Triggers are useful for one-shot events, like action events, but some events have an “opposite” event (pressing and releasing the mouse, entering and leaving a component, etc). The good thing is you can create an “autoreverse” trigger that will play the timeline backwards when this opposite event occurs: the values will smoothly be animated back to their original value. This is great for hover animations for instance.

Almost all of the original triggers have been ported except for the ones that didn’t make sense in this new context (TF uses triggers on animations to group them, in sequence or in parallel – eg start this animation when this one stops – and Trident supports that use case with timeline scenarios, so i didn’t feel they were needed here, feel free to comment on those)

Specifically, the supported event triggers are:

  • Mouse triggers: enter, exit, press, release, click
  • Action triggers: supporting actionPerformed
  • Focus triggers: gain, loss

The How

In the zip file linked at the bottom, you’ll find the simplest Trident demo modified to show how you’d use triggers. With that, the javadoc and the simple API, everything should be self explanatory.

Here is the one liner you just need to write to have a hover animation – while the mouse is over a button.

MouseTrigger.addTrigger (button, timeline,
    MouseTriggerEvent.ENTER, true);

And here’s the one starting a timeline when the button is pushed.

ActionTrigger.addTrigger (button, timeline);

Pretty simple. Thanks Chet ! (:

In the future, it might be possible to have triggers apply automatically to the object you’re animating. I’m not sure you can get that object back from the timeline right now, but it could be interesting to have for this very reason, and also to have callbacks that know about the main object without needing to give it to them (saves some code for repaints for instance). We’ll see with Kirill about that.

Extensibility, and porting existing triggers

Triggers are definitely an interesting concept, and the better thing is they can be extended easily. Maybe one could need triggers for other events. Feel free to ask, or do it yourselves (and maybe we’ll backport them to TF too, then).

For instance triggering animations on mouse wheel or drag and drop events, property changes, or maybe virtual events resulting from other changes. Those could be really useful for saying: start this animation when the mouse dragged this widget more than 10 pixels to the left, or my favorite (kinda hard to do at the moment, but i’m working on it) fade in and grow the radius of this motion blur when this widget is moving faster than x pixels/second and reverse that when it slows down (Those are the kind of features you usually only see in SFX tools like After Effects and the like, and i’d love to have that kind of power in Java too).

If you have an existing TF trigger, or if you find one you like on the intertubes and would want to use it with Trident, about the only thing you’ll need to do is replace the references to TF’s Animator to Trident’s Timeline, and that should be it since i’ve kept the API exactly the same (except renaming the focus constants, a subjective change, i thought FocusTriggerEvent.GAINED was more natural than FocusTriggerEvent.IN, could be better as FocusTriggerEvent.GAIN since the mouse’s are MouseTriggerEvent.ENTER and not ENTERED for instance, definitely something we can talk about). Let me know if you run into problems.

Creating one should be really easy too, just looking at the code for the core ones should convince you of that.

Okay, i’m sold, sir, where do i sign ?

Binaries here, source here (eclipse project, also includes the latest available trident jar as of right now, rev 42), sign here, credit card there, thanks mam and have a nice day.

As you probably know if you’ve read my previous posts, i’m more involved with Scenario at the moment (the über cool java thingy hidden under the arguably less cool javafx script thingy in the javafx runtime) and its animation support (based on evolving TF). However, I strongly encourage you to look at Trident, and its demos (+ Amber and Onyx) if you plan on adding animations to your java/swing apps (which you should, for basic usability reasons – hello, transitions! – at the very least).

Both Trident and TF are great animation libraries, the advantages Trident has, even though it’s probably less mature, is that the project is alive (TF’s state is not really clear, dormant, dead, spending spring break in Cancun, i don’t know), has some features TF is missing, and that it’s made by Kirill. TF’s are that it’s older and for that, probably used more, it has features Trident is missing, is more documented (the most recent doc is in a book, printed on real paper ! but you have to pay for it) and is made by Chet. Scenario’s animation support is good but has problems, mainly the license and the fact that it’s dead for the open source version, and the license and Oracle in the picture for the proprietary version (+ it’s proprietary i just said it).

So, triggers huh ? Hope you like it, see you soon (with something totally unrelated), or sooner than that on twitter.

xoxoxo
Rémy

Hacking Jersey/JAX-RS to run RESTful web services on Google AppEngine/Java

Update: this article is about Jersey 1.0.2, i’ll update the modifications i made for the 1.1.0-ea version soon.

Jersey doesn’t run out of the box on GAE, and since i can’t wait for a new release to try RESTful services on AppEngine/Java, let’s modify its servlet container so it will at least run basic samples.

I really find Jersey/JAX-RS compelling, while others think it could be the ultimate framework, and with all the recent buzz about the AppEngine platform, i wanted to try and make the two meet, grab a little dinner, a glass of wine or two, and make sweet web service babies. That didn’t go as easily as I planned, but after a little hacking i was able to run basic examples, which is probably enough for now, until a later release fixes the issues.

In this post i’ll describe what i did to make Jersey’s basic servlet example work (ie. what i broke) and provide you with the code (code + binary here) so you can try it on your own.

AppEngine runs a tight ship with strict security policies, which caused most of the errors you get using Jersey: classes you can’t access inside their sandbox. I’ve done my best bypassing those errors, and in doing so i actually removed and broke features, some of which i know about, the others, well, i don’t (:

The people following my twitter stream know i learned the hard way that the dev server google provides with its eclipse plugin doesn’t enforce the same security policies as their appspot servers (why is that is a question to which i don’t have the answer), and the kicker is that Jersey runs fine in their dev server….

The first major error you encounter is related to javax.naming.InitialContext, the second one to JAXB binding for WADL generation. I removed both the WADL pregeneration and root resources registration in the JNDI context. I don’t care much for WADL so it’s not a big loss anyway, however i’m not totally sure how the JNDI context is used inside Jersey. This might break something more useful.

A couple more classloader errors, and other tiny issues, and we’re good to go.

Here’s how to make the Jersey basic servlet sample (simple-servlet) run on AppEngine (which you’ll be able to see here for a little while, if you want to test it. It comes with a little ajax ui changing Accept headers, choosing resources to test, etc)

Create a GAE using the Google plugin for Eclipse, add the jersey jars into the war/WEB-INF/lib directory (i used the jersey archive found here to get Jersey, its dependencies and the samples), while you’re at it also add the modified jersey servlet container there, jersey-appengine-container_0.1.jar found in the linked zip file.

Add the modified servlet (org.hybird.appengine.jersey.container.ServletContainer) to web.xml:

<servlet>
<servlet-name>Jersey Web Application</servlet-name>
<servlet-class>org.hybird.appengine.jersey.container.ServletContainer</servlet-class>
<init-param>
<param-name>com.sun.jersey.config.property.packages</param-name>
<param-value>com.sun.jersey.samples.servlet.resources</param-value>
</init-param>
<load-on-startup>1</load-on-startup>
</servlet>
<servlet-mapping>
<servlet-name>Jersey Web Application</servlet-name>
<url-pattern>/resources/*</url-pattern>
</servlet-mapping>

Now you can take the simple-servlet sample, copy its index.html in the war folder, and java source files inside your src. And if i remember correctly, that should be it ^^ and you’ll get the same app as i have.

Since Jersey has so many features (a lot more than the JAX-RS spec would let you believe), i haven’t had the time to test a lot of them yet, and i think other security exceptions are probably waiting for us.